| |
NOTE: THIS CALENDAR IS WRONG.
This schedule is the actual class notes from the previous Digital Imaging class I taught, and a prediction of topics and times for our class.
Reality is great at thwarting plans -- that goes for my schedule, as well as your projects.
To see what topics were actually taught and what homework was assigned,
REFER TO THE REGULARLY UPDATED CLASS NOTES IN CARMEN. |
Reverse chronological order / newest first:
-
Week 15b (Wednesday 12/03/14) - FINAL PROJECT CRITIQUE
-
Art & Tech show
-
Review details & dates
-
Seek volunteers
-
Week 15a (Monday 12/01/14)
-
Week 14 - THANKSGIVING BREAK - no classes Monday or Wednesday
-
Week 13b (Wednesday 11/19/14)
-
Art/Inspiration: Three artists from the Green Museum (“online museum that showcases environmental artwork”)
-
Before we go on break, and since our final two classes won’t have much teaching, some advice that might help with your Final Project:
-
Don’t forget about our online textbook and its downloadable extras
-
Lynda.com tutorials (first choice of design professionals, and expensive) are available free at the OSU Digital Unions (closest: Hagerty 171a / Stillman 145)
-
As you might guess, YouTube has lots and lots of tutorials (but they typically wont be as good as Lynda.com’s)
-
Art & Technology has two labs, both of which are staffed by Art & Tech grad students, and nearly all of them have taught (or are teaching) Digital Imaging classes. Ask nicely, and they’ll help.
Print Lab: Hopkins Hall 180 annex
New Media Robotics Lab: Hopkins 160
-
Buy your frame sooner rather than later
-
Your frame should be good quality and simple, such as this line of Michael’s frames (you can take the #2 High Street bus to Michael’s from OSU campus)
-
TIP: avoid frames with a mat (like this one) or with ornate textures (like this one). Mats tend to be space wasters and textures distract from your art -- and faculty/judges don’t tend to like them. Remember that your art should look like it belongs on a wall in a gallery, rather than a home.
-
Final Project discussion -- any questions about…
-
Final Project in-class work time / Meet everyone individually to discuss project plans
-
Week 13a (Monday 11/17/14)
-
Art/Inspiration: Two unsolved mysteries!
-
(As you watch these, write down five words about the works)
-
The Voynich Manuscript (only copy is available at the Yale Library)
-
Luigi Serafini - Codex Seraphinianus (available at OSU Thompson/Main Library, unless you have $1,000 and up to buy a copy)
-
Auto slide shows: Voynich Manuscript / Codex Seraphinianus
-
Alright, let’s write some of your words on the board in Photoshop
-
What do these two books have in common?
-
What don’t they have in common?
-
Do you believe the Voynich Manuscript depicts real things?
-
Do you think either book is written in a real language?
-
Is one more believable than the other? Why?
-
Does knowing that the Codex is created as an artwork by a known artist change your perception of the work? Or of the world it depicts?
-
Do you think Luigi Serifini was influenced by the Voynich Manuscript? To prove something about it? That it was a hoax? Or real?
-
More to chew on…
-
Where are we now? What’s coming up?
-
4 classes remaining (including this one)
-
Final Project work begins now (proposal due Monday Wednesday)
-
Artist research paper (1 - 1½ pages) due also
-
Printing & framing of final project
-
Final project class critique immediately after Thanksgiving
-
Art & Tech Art Show -- drop-off day replaces our last class day Dec 8
-
Final Project: Printing & Framing
-
Printing your final project on our large-format printers
-
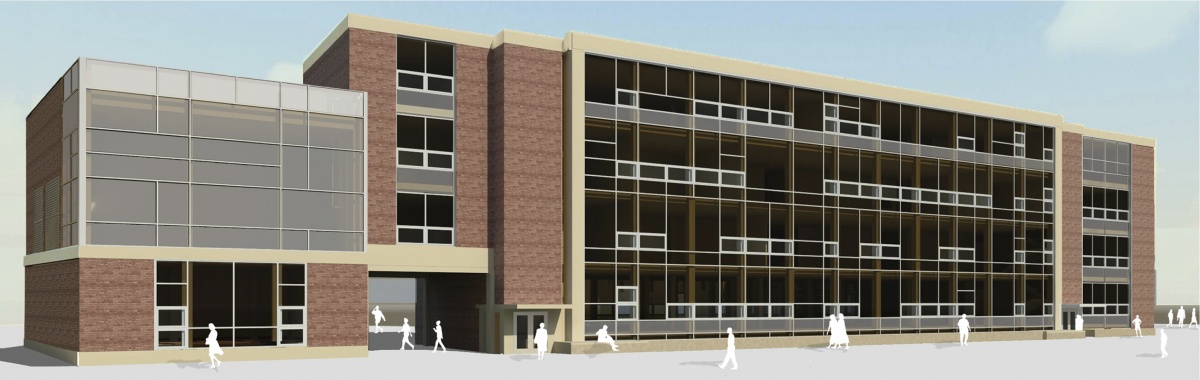
On Tuesday, we’ll arrange a window of time when you can drop off your file to be printed in Print Lab 180 (annex on the left side of this photo of Hopkins)
-
For printing, save your final image in TIFF format
-
Check that your Image Size in Photoshop is set to the correct size to print
-
The higher resolution the better -- 36 inches at 300 DPI is 10,000 pixels!
-
Caution: Simply increasing the number of pixels of your finished image will NOT create more detail!
-
You will have the option to print on matte or glossy paper
-
Payment is in cash and due before printing
-
Before printing, you MUST:
-
Set your print size (under Image Size in Photoshop)
-
Save your final image in TIFF format
-
Choose your paper: matte or glossy
(note that glossy prints cannot be wider and taller than 24”)
-
Bring cash -- payment is due before printing
(to give you an idea how much, a 30” x 24” print will cost $12.50)
-
Mid-project critique
-
Framing
-
Top Reasons Why Works Don’t Survive Judging:
-
Bad or cheap framing (or worse, no frame at all)
-
Poorly mounted within the frame (off center; backing visible)
-
Poor printing (low-end printer, or with low-grade paper stock)
-
Not ready to mount / no mounting hardware
-
Too small -- 4 x 6 (for example) would be just too small for a gallery context... and since all artwork is judged on the floor before being hung, the judges may not even notice it at all
-
Use the above points as a checklist to grade your own work
-
Unsure if your work is ready? Ask someone in this class to critique your work. “I like it!” does not count as a critique. Ask for in-depth feedback and tell them to be honest to the point that it hurts. (Hurts YOU, not them.)
-
Week 12b (Wednesday 11/12/14)
-
Week 12a (Monday 11/10/14)
-
Week 11b (Wednesday 11/05/14)
-
Art/Inspiration:
-
Happy Guy Fawkes Night/Day!
-
Guy Fawkes is well known in UK history for his part in the Gunpowder Plot, but in the US he’s largely known indirectly via…
-
V For Vendetta (1982 comic book, then a 2006 movie) in which the main character wears a…
-
Guy Fawkes mask, which has increasingly become the symbolic mask of whistleblowers and people who speak out against authority and government
-
And the logo for the protest/hacker group Anonymous
-
Locally tonight: Gunpowder Plot at Scarlet & Grey Cafe (DJs; VJ Vendetta)
-
Kerry James Marshall talk this Friday @ Mershon Auditorium (free)
-
Monday: Green screen room day oops; that’s our critique day… duh
-
Discussion of reading: Slides and Prejudice, by Linda Yablonsky
-
Who can summarize the article?
-
Controversy about paintings using Photoshop sources
-
Anyone in class a painter?
-
Who thinks this is a controversial issue?
-
These are often photorealistic paintings, but not always
-
Some allow painting to fill in lost detail in a too-small source
-
“All you ever get from photographs are clues.”
-
Undress A Giraffe part 2 (from Step 13)
-
Step 14: MUCH BETTER by using Edit > Fill with Content Aware
-
Step 18: Erase head & legs from top “undressed layer” exposing parts of the old original giraffe image (you did make a duplicate before you started...?)
-
Step 19: Spot Healing Brush Tool to heal white spots and blotches
-
Project #3 work time
-
HOMEWORK:
-
Week 11a (Monday 11/03/14)
-
Art/Inspiration: (Project 3 related)
-
Review keywords we picked -- any more to add?
-
Here’s some words a previous class came up with:
Satirical
Statistics
Politics
Warfare
Comparisons
Outlook
History
Habits
Inequity
Representation
Abstract |
Collaboration
Mass Participation
Senses
Census
Seeing the invisible
Interactive
Sheep
Performance
Choirs |
-
Use these keywords to help define and inspire your own project
-
Homework for Wednesday: Read Slides and Prejudice, by Linda Yablonsky
-
Undress A Giraffe tutorial
-
Before starting download the images of a giraffe and an ironing board from Carmen (Content > Images) or from osu.box.com
-
This tutorial was made back in version CS3 of Photoshop... my notes below mention a few updated tools they didn’t have then, and also simplify the tutorial a little by calling out some less important steps
-
Step 2: Simplify by excluding the gradient
-
Skip steps 5-7
-
Step 8: You could use the polygonal lasso tool... but what else?
-
Save Selection
-
Step 10: Instead of inverting and clearing, make a quick mask
-
Step 12: Tricky and frustrating, but really adds color
-
Pause and we’ll pick up again Wednesday -- Photoshop file of TradeMark’s Undressed Giraffe so far uploaded to osu.box.com
-
Project #3 work time
-
HOMEWORK: Read Slides and Prejudice, by Linda Yablonsky
-
Week 10b (Wednesday 10/29/14)
-
Art/Inspiration: Two articles about making an image that goes viral
-
My Photo Went Viral, And Nothing Could Have Prepared Me For What Happened After
-
“I was getting calls at all hours of the day from every corner of the globe. [...] I just stayed up and continued to answer emails and calls, providing anyone who needed an interview with an interview, trying to negotiate rates for publication, knowing that it wouldn't last forever.”
-
“And to those of you wondering, yes, many of the larger online publications are happy to pay you for original unique imagery when you ask them!”
-
”So how and why exactly did this image go so 'viral'?” section
-
“I posted it to reddit, a site known for spawning some of the web's most viral images [...] without a watermark at a relatively large size of 2000px wide...” (great analysis follows)
-
“Another reason I think it went so viral is that so many people could identify with it”
-
Honestly, this image has eclipsed everything I have ever done from almost every angle. I am no longer 'Mike Kelley the architecture guy' [...] I'm now "the guy that took that one picture of the planes at LAX and was on the news for a bit". I continue to get calls daily about interviewing me or purchasing prints. Every day, someone sends me a link to another news site or feed using the image.”
-
When Your Art Goes Viral, the Internet Will Kill Its Image Quality
-
“The image was filtered, cropped, saved at lower resolutions, and shared with quotes he didn't write, proving that, once again, the internet doesn't care about the best laid plans of content creators.”
-
“...often, it means a whole lot of nothing. As in, credit for the image is stripped, it's uploaded to something like Imgur or Instagram, everyone agrees it's a lovely image, and the artist doesn't really see any sort of notoriety or sales bump because of it.”
-
“Obviously, this particular photo is still powerful and still resonated with people even once it began to look almost nothing like the original.”
-
Good quote from the artist in final paragraph
-
Science Sundays lecture this weekend: James Sneyd – Mathematics and Music: the beauties of pattern
-
Class critique/discussion of project 3 proposals
-
Share proposal ideas & images with the class
-
Class offers feedback on each proposal such as:
-
What parts of the proposal are most successful?
-
What parts are lacking and need clarification or improvement?
-
Could the intended message be misconstrued in some way?
-
Ideas that could help the artist/student (“I saw a website that could help you…” or “I saw a similar artwork that would’ve been better if the artist had done ____ differently”)
-
Unsure of some part of your project? Ask the class to help you decide
-
Improve your project by integrating (or not) class feedback into your plan
-
While this class discussion is not graded per se, class participation is
-
Could someone keep time? 6 minutes per proposal
-
HOMEWORK: Begin work on Project #3 due on November 10 (in 12 days)
-
Week 10a (Monday 10/27/14)
-
Art/Inspiration: related artists for Project #3: (emailed last week)
-
Infographic: The Languages Of New York, Mapped By Tweets
-
Komar and Melamid
-
From Wikipedia:
Komar and Melamid's People's Choice series, 1994–1997, consisted of the "most wanted" and "most unwanted" paintings of 11 countries. The artists commissioned polling companies in the 11 countries—including the United States, Russia, China, France, and Kenya—to conduct scientific polls to discover what they want to see in art. The use of polls was meant to mimic the American democratic process. Komar said, "Our interpretation of polls is our collaboration with various people of the world. It is a collaboration with [sic] new dictator--Majority." The process was also meant to change the artists role as a leader. Komar and Melamid believe that the broad public is an adequate judge of art, contrary to the historical precedence, much in the same way that the broad public in America is entrusted with electing the President. It is a new type of leader, one that asks questions, instead of a dictator. Melamid said, "Picasso mimicked Stalin, so we try to mimic Clinton."
-
People’s Choice Paintings - The Most Wanted and Unwanted Paintings
-
People’s Choice Music - The Most Wanted and Unwanted Songs
-
Visual Complexity site
-
Jason Salavon
-
Infinite Jukebox:
-
Josh On & Futurefarmers Project "They Rule" - maps of corporate connections
-
Check email for other artists of interest
-
Proposal is due on Wednesday 10/29/14
-
lynda.com Tutorial | Photoshop CS5: Creative Compositing
-
To follow along/practice do an image search for “holding a cup”
-
Also find an image of something else for the person to hold (like a can of beer… or a teddy bear… or maybe a real bear? you decide)
-
Lynda is one of the best websites for professional tutorials on Adobe products including Photoshop
-
Free access available at OSU Digital Union locations (Hagerty Hall is closest)
-
A few new techniques & shortcuts:
-
Shortcuts:
-
Fills
-
Canvas Size
-
Image Size
-
Image Crop
-
Week 9b (Wednesday 10/22/14)
-
Week 9a (Monday 10/20/14)
-
Week 8b (Wednesday 10/15/14)
-
Art/Inspiration: related artists for Project #2
-
COR&P / art opening / artist talk: Night Talk with Suzanne Silver
-
Want a higher grade? Two options for 3 points of extra credit:
-
Extra Credit, option 1: Write a brief (2 page) paper about an artist/curator talk
-
Extra Credit, option 2: Write a brief (2 page) paper about an artwork you visit
-
Filters (textbook chapter 14)
-
aka Plug-Ins
-
I saved these for later for good reasons, especially: filters are often viewed as a cliche of Photoshop, or a lazy shortcut -- avoid distinctive filters
-
Most useful filters for me: various Blurs
-
Filter Gallery contains many filters -- some are elsewhere in the Filters menu; some are not
-
Liquify
-
Oil Paint
-
Distort
-
Stylize
-
Render > Clouds is interesting as a mask or with different blending modes
-
Nice chart comparing all the blending modes on p. 139 of our textbook
-
Popular ones: Darken, Lighten, Multiply, Overlay
-
Scanning
-
Two scanners in this room; two more down the hall
-
Most scanners have a standalone program for scanning (search for an application by the scanner manufacturer, e.g. “Epson Scan”)
-
TIP: Scan directly into Photoshop via File > Import > Images From Device
-
Position object to far right corner
-
Settings
-
Kind: Color, almost always (maybe Black & White occasionally)
-
Colors: Billions
-
Resolution: 600+
-
Format: TIFF
-
Descreening: Only if from a magazine or newspaper
-
Overview/preview first
-
Select the scanning area
-
Scan!
-
In-class work time / Talk to everybody one-on-one about their projects
-
HOMEWORK: Complete Project #2 (two images)
-
Week 8a (Monday 10/13/14)
-
Art/Inspiration: Erik Johansson (again)
-
Due dates -- lots of them now on the calendar
-
Project #2 due in one week (week 9)
-
Weeks 10-12: Project #3
-
Weeks 13-15: Final Project
-
Thanksgiving week: no classes at all; I’ll be in Mexico that Monday
-
Week 16: Art & Technology art show / finals week
-
Torture Tutorial revisited -- let’s dissect a few steps & techniques:
-
As we review these, be thinking of how these techniques could help your project
-
Recap: We took our photo, Laid on some stitches, Killed a finger, and infected the stitches
-
Sponge tool -- for saturation & desaturation
-
Dodge and Burn tools -- lighten or darken where you draw, and only in a specific range (shadows/midtones/highlights)
-
Image Adjustments > Hue & Saturation
-
More on Image Adjustments: (under the Image menu > Adjustments)
-
First, get the practice images (part of the practice images from our textbook)
-
Hue & Saturation
-
...not in the tutorial, but let’s see other image adjustments:
-
Brightness/Contrast
-
Levels
-
Curves
-
Shadows/Highlights
-
Vibrance
-
Color Balance
-
Invert, Posterize, Threshold -- more like special effects than adjustments
-
Warning: Image Adjustments are destructive edits -- can’t undo later
-
However, most Image Adjustments are also available as Adjustment Layers, which are non-destructive
-
A few editing tools under Edit menu:
-
A little more on Layer Masks from chapter 7 of our textbook
-
Again, helpful tip: painting the mask directly, using X to flip the foreground/background back and forth
-
Using a gradient fill for the mask
-
Refine masks in the Properties window (thanks for the reminder, Matt!)
-
Chapter’s final advice is worth remembering:
“Layer masking and advanced selections go hand in hand. The more you practice one, the easier both will get. New users often lapse into bad habits and are drawn back to features like the Eraser tools or Copy and Paste commands. Although these may seem easier, in the long run they are not. Learn to work like a professional, and you’ll achieve professional results.”
[ BREAK ]
-
In-class work time for Project #2… and simultaneously...
-
Let’s play Photoshop Telephone:
-
This is a pass-it-on game/project where each person does 5-10 minutes worth of work on an image, then passes it to the right
-
Today’s theme: DIGITAL LANDSCAPE… I’ll start an image and upload it to osu.box.com
-
Use this as a chance to brainstorm project ideas and try out new P‘shop skills
-
Don’t forget to write down any good ideas you have while working today!
-
One at a time, each person in class will:
-
Download the Photoshop file from osu.box.com
-
Create a new layer (Command-Shift-N)
-
Add your own warped item to the scene
-
If you want, you can change what previous people have done
-
Save the file in Photoshop format (don’t change the file name)
-
Upload the new version replacing the old
-
Tell the next person it’s their turn
-
Things you might do:
-
Add strange objects, animals, or vehicles on the land or in the air
-
Expose something “hidden” in the trees, under the ground, or beyond the horizon
-
Get surreal with Transforms like Warp or Puppet Warp
-
Use text to caption a small story about something that happened in this image, or to let a character speak through a word balloon
-
Practice some of the techniques from our Torture Tutorial
-
Photoshop Telephone critique -- let’s see the final image!
-
Week 7b (Wednesday 10/08/14)
-
Art/Inspiration: Semiconductor - Vimeo channel
-
Sent an email last night to the class with a few tips that might help your proposal
-
Class critique/discussion of project 2 proposals
-
Share proposal ideas & images with the class
-
Class offers feedback on each proposal such as:
-
What parts of the proposal are most successful?
-
What parts are lacking and need clarification or improvement?
-
Could the intended message be misconstrued in some way?
-
Ideas that could help the artist/student (“I saw a website that could help you…” or “I saw a similar artwork that would’ve been better if the artist had done ____ differently”)
-
Unsure of some part of your project? Ask the class to help you decide
-
Improve your project by integrating (or not) class feedback into your plan
-
While this class discussion is not graded per se, class participation is
-
Could someone keep time? 6 minutes per proposal
-
Artistic Licenses
-
After your proposal, come up and make your artistic license
-
Whoever volunteers to go first, I’ll make yours as a demo now
-
Three prints: “Lighter”, “Vivid”, and regular -- your choice, but lighter is probably best
-
Week 7a (Monday 10/06/14)
-
Art/Inspiration: related artists for Project #2
-
HOMEWORK: Work on your proposal for Project #2 (due Wednesday)
-
Project #2 is beginning:
-
Read/discuss description
-
Let’s type out some relevant words about this project
-
Titles from that symposium’s schedule of talks can give us more words/clues
-
Brief 1-2 word descriptions of the related artist works can provide more
-
Project #2’s proposal is due Wednesday (10/8/14)
-
Artistic Licenses: hopefully printed and here; when you’re done with the tutorial come up and cut yours out and laminate it Alas, couldn’t print them -- we’ll get ‘em later
-
Torture A Man tutorial (thanks to Florence for this!)
-
Download stitch & suture brushes (from that link, or from Carmen > Extras, or Google “obsidian dawn stitches”)

Take YOUR OWN photo in Photo Booth -- drag to desktop, then into Photoshop and resize like this:


-
Week 6b (Wednesday 10/01/14)
-
Art/Inspiration: Microphotography (aka Photomicrography)
-
Project #2: Technoscape
-
Read description
-
Look at past student works
-
Note that the related artists cover a very wide range of work: microscope photography, online videogame worlds, still images, webcams…
-
Proposal for this project is due in one week (10/08/14)
-
"Who's the real master: the painter of a renaissance masterpiece, or the one who can paint a convincing fake of it?" (American Hustle)
-
Most said “Original”, but Aaron & Chris voted for the faker… why?
-
A few said “Both”, which led to this great exchange:
Irreverence: Define “Master”.
Laura: Original is master of idea; fake is master of replication.
...so, master of what idea? of what sort of replication?
-
Art and Craft is a new documentary about an art forger -- trailer
-
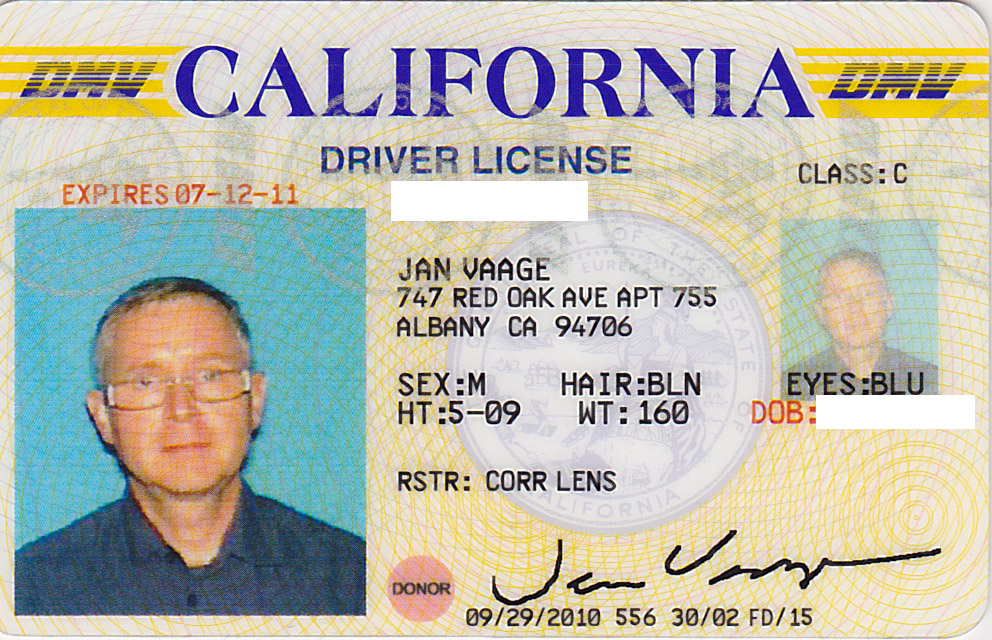
Artistic Licenses
-
Making your own Artistic License
-
First we need two photos, which you take via the Photo Booth app on Mac
-
Open both in Photoshop
-
Open the Artistic License starting template -- you can ignore the error message about missing fonts
-
You don’t need to fill out the application form, but it may help to see it as you put your own info into your license (especially the Artistic & Behavioral codes)
-
Edit the name & address text (double click on the text layer)
-
Edit the expiration date to your birthday plus four years
-
Crop your face photo if needed, using Photoshop’s Crop tool (Tool #5)
-
Balance the light/color levels (via Image Adjustments)
-
Copy and Paste Into the license's main photo:
-
Select the “Main Photo” layer
-
Select the layer’s content: Command-click on its thumbnail, or “Select Pixels”
-
Edit > Paste Special > Paste Into (shift-command-option-V)
-
Copy (command-C) your photo and Paste Into the smaller photo layer
-
Merge your pasted photo layer with the smaller photo layer
-
Change the layer's opacity to 25% or less as appropriate
-
Edit the text for sex, hair, etc.
-
Decide & type in your Artistic & Behavioral codes
-
Also decide on a medium for your art (“Audio”, “Photo”, “Life”, etc.)
-
The Signature: How best to copy only the black ink of your signature and leave the white paper background transparent? Many possible methods…
-
Quick select one letter of the signature, then Select > Similar
-
Quick select the paper background, Select > Similar, and Delete (make sure to unlock your background layer first)
-
Select > Color Range then draw over some black letter parts
-
Might help to first do some Image Adjustments, like high brightness
-
In your license, select the Signature layer and delete the contents
-
Paste your signature (it’s probably very large -- Free Transform it to the right size and position)
-
Save your license in Photoshop format
-
Also save your license in TIFF format (just click Okay for the options)
-
Upload the TIFF file to the Completed Licenses folder in our shared area
-
Done!
-
A few layers of interest
-
The Signature layer has Effects > Stroke beneath it, which is a layer style
-
Other common layer styles: drop shadow, outer glow, color overlay
-
To create a layer style click fx on the bottom of the layer list
-
The Yellow Pattern layer at the bottom creates the yellow circle background pattern -- option-click its eyeball to see it alone
-
But it’s just gray! The yellow comes from the Hue/Saturation adjustment layer above it
-
The US and ARTISTIC LICENSE text layers have a yellow warning because the font isn’t on your computer -- BUT it will still appear correctly, at least until you try to edit it. Go ahead, try. The font will completely change.
-
If there’s time, let’s go to the Print Lab (180 Hopkins, annex building) to print them and then laminate them!
-
HOMEWORK: Work on your proposal for Project #2 (due in one week)
-
Week 6a (Monday 09/29/14)
-
Week 5b (Wednesday 09/24/14)
-
Week 5a (Monday 09/22/14)
-
Art/Inspiration:
-
Project #1 is due WEDNESDAY at the start of class! Before then, you must:
-
On Wednesday’s class critique we will:
-
View each person’s images
-
Discuss what we see in them (while the artist says nothing!)
-
Discuss what impressions and messages we interpret from the images
-
Finally, we allow the artist to speak for themselves (if they choose to)
-
Projects are graded based on concept, creativity, composition, and craftsmanship (as detailed at the bottom of each project page)
-
Does everyone have a partial image or something to show for Project #1? If so:
-
Pair off
-
One person starts by showing their project images so far
-
The other person gives feedback, specifically describing what they think is the project’s strongest point as well as the project’s weakest point
-
Switch roles
-
Video: You Suck At Photoshop #3: Clone Stamp and Manual Cloning
-
Making things disappear (also see chapter 11 in our textbook)
-
Example image: FedEx Delivery Truck (download the full resolution version, 2816 x 2112 pixels)
-
We’re going to make the logo & text disappear -- fairly easy, but a little tricky due to the different shading between the front and back of the truck
-
Photoshop often gives you many different ways to do (almost) the same thing
-
First, you start -- lemme hear a few ways to erase the text (convincingly or not)
-
Copy & paste from nearby blank space (simple but often extremely successful!)
-
Fill with nearby color
-
Clone Stamp
-
Spot Healing Brush & Healing Brush
-
Patch Tool (Normal vs. Content-Aware
-
Fill, content aware
-
Usually in the end, a combination of the above
-
Text tricks (thanks for the request, AdaObinna!)
-
To change text color/size/attributes, first select the text to change
-
Text options under Window > Character: color, size, etc.
-
Warped text (via the text options, top of screen)
-
For more extreme warping, rasterize your text or layer (Layer > Rasterize)
-
Warping tools:
-
Blending modes (textbook chapter 9)
-
Blending modes help to make layers combine more believably with each other
-
All layers, as well as some tools, have blending modes which determine how a layer blends with layers beneath it
-
Nice chart comparing all the blending modes on p. 139 of our textbook
-
Popular ones: Darken, Lighten, Multiply, Overlay
-
Many less popular ones you’ll never use
[ BREAK ]
-
Meet with everyone individually about project #1 work
-
Everyone I’m not meeting with: work on your project!
-
HOMEWORK: Complete your 3 images for Project #1
-
Week 4b (Wednesday 09/17/14)
-
Art/Inspiration:
-
Photoshop Disasters: (aka, how not to use Photoshop)
-
Boing Boing:
-
A recent meme: 34 Panoramic Photos Gone Terrifyingly Wrong
-
Truth in Advertising Act could provide disaster relief:
-
“Excessive Photoshopping has gotten a lot of press in recent years, and anti-Photoshop advocates might finally get what they’ve been seeking thanks to a new bill that just hit Congress. The Truth in Advertising Act (H.R. 4341) is a bi-partisan bill created by Republican Rep. Ileana Ros-Lethinen and Democratic Rep. Lois Capps that demands a plan be set forth to regulate excessive Photoshop use in advertisements.”
-
Do you think Photoshopping in ads and magazines is really that common?
-
Is that bad or good?
-
What Photoshopping techniques/tools are deceptive? What ones aren’t?
-
Project #1 due date: Wednesday, Sept. 24
-
Proposal dropbox is now open
-
Course notes updated
-
Homework reading discussion: Copyrights & Art article
-
Admittedly, I’m a terrible role model for this.
-
This article is pretty kind to the whole messed up copyright system
-
Can anybody define copyright?
-
Know how long it lasts?
-
What kinds of works does it cover?
-
Right Of Celebrity
-
Alternatives:
-
Can anyone name any copyright suits? (Obama, Shepard Fairey...)
-
In this age of Bit Torrent and “everything’s on YouTube”, is copyright still relevant? How?
-
Discuss the final paragraph
-
What does all this mean for your projects? Not much.
-
Just discovered that OSU has a Copyright Resources Center
[ BREAK ]
-
Sources of imagery
-
As we explore these, think about images you’ll need for your project
-
Remember:
-
The better quality images you start with, the better your results
-
Better Quality = MORE PIXELS (well, usually)
-
Photograph your own
-
You’ll never get in trouble for using someone else’s image
-
Frees you from being limited to “whatever you could find”
-
You’ll get a better resolution photo than what you’re likely to find online
-
Borrow a FREE digital camera from Classroom Services (with a permission slip I’ll need to sign)
-
Don’t just use your cell phone -- cameras are almost always better
-
Scan your own
-
Frees you from being limited to “whatever you could find”
-
You’ll get a better resolution photo than what you’re likely to find online
-
Scanners located in our classroom and in the computer room down the hall (Hopkins 346)
-
Anyone need to scan images for project 1 but haven’t scanned high resolution imagery before?
-
Chapter 3 of our textbook is all about acquiring images
-
Google image search -- use “Search Tools” to specify “Large” (high resolution) or “Larger Than” (even higher resolution) images
-
Flickr.com
-
Advanced Search lets you search only Creative Commons images (important for anything you want seen/shown outside our class)
-
Note that there are different “flavors” of CC licensing
-
ALWAYS “View All Sizes” (under Actions or click the zoom icon) and download the highest resolution offered
-
The Getty and Google Unleash Free Art (article that leads to this)
-
Photo Gallery | University Communications - The Ohio State University
-
MorgueFile: Free archive of high resolution stock photos (link in Carmen)
-
OSU Library -- specifically their databases, like these Art & Architecture ones
-
The Internet Archive (no still images, but lots of books and videos)
-
Richard Harrington’s (author of our textbook) government image links
-
Our tax dollars pay for government work, including all images they own
-
Effectively those images are owned by you -- use ‘em
-
But... many are pretty low resolution, and the many website aren’t easily searchable
-
Where else is good online? Anyone know additional good websites?
-
Anyone not quite sure where to find source images for your project 1?
-
HOMEWORK: Work on images for Project #1 (due in one week)
-
Week 4a (Monday 09/15/14)
-
Art/Inspiration: Worth1000.com Photoshop contests
-
HOMEWORK: (I didn’t assign this Friday, did I?)
-
Still haven’t opened the drop box for proposals, sorry
-
Face Swapping
-
For today’s Photoshop play, find photos of two famous faces (I’ll try Lady Gaga and Freddie Mercury (of Queen) who sang Radio Gaga)
-
Start at Google Image Search
-
Click Search Tools > Size > Large (or Larger Than) to get high resolution
-
Note that hovering over each image shows you the resolution
-
Click the image you want, then click the View Image button
-
The image, alone, will display on a new tab -- then just save that web page (which will save as an image file you can open in Photoshop)
-
When selecting images to combine, consider things like:
-
We’ll revisit how to find images online later in depth
-
Now to Photoshop:
-
Open the images you downloaded
-
Also create a new image/file (Command N)
-
Choose the size/resolution
-
Now, swap their faces!
-
Copy (Command C) and paste (Command V) between open images
-
Don’t forget tricks like:
-
Quick select
-
Feathering your selection
-
The eraser tool to expose lower layers
-
UNDO! (Command-Z)
-
Image Adjustments, such as Brightness/Contrast or Hue/Saturation
-
Layer masks -- and if you want to learn more about them, read chapter 7 of our textbook
-
Some new tricks that might help
-
Practice time, and I’ll check in with people about their projects
-
HOMEWORK: Copyrights & Art article
-
Week 3b (Wednesday 09/10/14)
-
Week 3a (Monday 09/08/14)
-
Art/Inspiration:
-
Project 1 -- any questions about the proposal due by our next class (Wednesday)?
-
Visit the Art & Tech Lab 160 to check out a camera and tripod
-
While we’re here, let’s enjoy the change of scenary and discuss the reading:
Postmodernism and Photoshop
-
Magic Lantern projectionist as DJ
-
Where “cut and paste” comes from
-
1980’s sees the world embrace Post-Modernism; also digital tools
-
Post-Modernism produces remix culture
[ BREAK ]
-
Take some photos outside the classroom that we’ll make into “Limb Mutants”
-
Upload the photos from the camera to our shared area at osu.box.com
-
Everyone download ‘em
-
Create our own mutants by layering images and selectively erasing
-
Layer Masks: a non-destructive alternative to erasing
-
Image Adjustments: changing brightness, contrast, etc.
-
Week 2 (Wednesday 09/03/14)
-
Art/Inspiration:
-
Did everyone do their questionnaire?
-
Everyone hopefully has swipe access now?
-
Discussion about “Digital Fluff” reading
-
Choose higher resolution than you need
-
You can downsample, but don’t upsample -- you cannot “create resolution”
-
PPI, SPI (???), DPI, LPI
-
Demo w/Sound Of Plaid logo: large / small
-
Photoshop Primer, continued
-
Open an image from the Selection Practice Images you downloaded last week in Photoshop CS6
-
Last week refresher:
-
Mac Command key = Windows Control key
-
Mac Option key = Windows Alt key
-
Click and hold on a tool to get variations of that tool
-
Zoom: Command-Plus and Minus, Command-0 (zero), Command + mouse scroll wheel
-
Selection tools: marquee, lasso
-
Move tool (V)
-
Command key to move selection
-
TIP: Shift, Alt, and Command often alter how ALL tools work
-
Learn the shortcut keys -- they really speed things up
-
There are a few keyboard shortcut cheat sheets in Carmen’s Content > Extras
-
Windows: navigator, history, layers
-
More selection tools: Quick Selection & Magic Wand (W)
-
Add to selection (shift) / subtract from selection (alt)
-
Selection drop-down menu:
-
Select by Inversion (select/invert)
-
Select by color (select/similar)
-
Select by range (select/color range)
-
Deselect (cmd-D)
-
Modify selection: Feather, Expand, Contract, Grow, Border
-
Playtime
[ BREAK ]
-
Art/Inspiration: Erik Johansson
-
HOMEWORK: Read: Postmodernism and Photoshop
-
Discuss “Seeing Is Believing” (our attendance sheet question)
-
Project 1
-
Finding Images - a brief primer
-
Back to Photoshop
-
Brush (B) drawing
-
Setting foreground/background colors, and switching them (X)
-
Eraser (E)
-
Text (add & modify text) (T)
-
Transform (cmd-T): scale (hold shift and drag corner to maintain proportions), rotate
-
Layers:
-
Opacity
-
Flatten
-
Merge Down (cmd-E)
-
Merge Visible
-
File Formats: Photoshop (PSD) and JPEG (JPG)
-
HOMEWORK:
-
Week 1 (Wednesday 08/27/14)
-
Introduction - move seats to the middle and let’s meet each other
-
About me, TradeMark G:
-
Music background, The ECC, my history with Photoshop, why Photoshop is important to a musician like me, Photoshop “samples” and remixes as I do in music, introduces issues of authenticity
-
Photoshop is so important its name has become a verb (a la Xerox & Kleenex); because of it, seeing is no longer believing
-
As the rest of the class introduces themselves, please tell us
-
Your name, and name you prefer to be called
-
Your major or area of interest
-
Why this class interested you
-
A “digital fake” you liked or disliked -- that could be a photoshopped image, or a CGI movie scene, a viral YouTube video, musical mashup...
-
btw, please expect most classes to begin seated in the middle
-
Pass around building access sheet
-
SYLLABUS (it’s in Carmen)
-
Review this class’s Carmen page
-
News
-
Content
-
Readings: read the Scanning, Resolution, and Digital Fluff article by Monday
-
Extras: Everyone download the Selection Practice Images file NOW
-
Dropbox
-
Surveys
-
Art/Inspiration
-
Every day we will begin with a collection of inspiration by looking at artists who work in digital imagery (or not)
-
These are inspiration for Project 1 - let’s read its description now
-
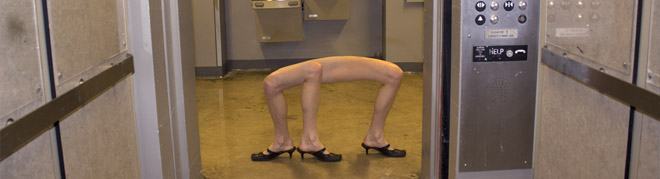
Matt Siber
-
Untitled #13 -- start with View 2 -- what are we looking at?
-
then View 1 -- how does this answer the previous view?
-
What does this say about advertising? About text? About image?
-
Why did the artist put the text next to the image?
-
Untitled #8 -- What are we looking at? How does the separation of image and text change these billboards? Surrealist, yeah?
-
View more
-
When I initially saw these, they were display with the image only... the text kind of gives it away, but also delivers a clearer message
-
More powerful when larger & framed
-
Is the artist changing his environment?
-
How might your perception of billboards and advertising change next time you drive on the highway?
-
Ron English
-
The Evolution Control Committee (aka me, TradeMark Gunderson)
-
Photoshop Primer -- the basics
-
Pick an image from the Selection Practice Images you downloaded earlier and open it in Photoshop CS6
-
Anyone never used a Mac before?
-
Learn the shortcut keys -- they really speed things up
-
This should help: Photoshop Keyboard Shortcuts Cheat Sheet (in Content > Extras)
-
Windows: navigator, history, layers
-
Undo (cmd-Z) - change History States in Preferences > Performance History from 20 to 200
-
Toolbar: Move (V), Selections (marquee rectangle/elliptical (M), lasso/polygonal lasso (L), magic wand/quick selection (W)
-
Click and hold on a tool to get variations of that tool
-
Zoom: Cmd-Plus and Minus, Cmd-0 (zero), mouse scroll wheel
-
Saving
-
HOMEWORK: Questionnaire & read Digital Fluff article
|
|